Sunday, December 23, 2012

The Power of Failure

Wow.  It's been a while since my last post.  I was... delayed.


If you ever bought a house and had to deal with bankers, brokers, realtors, contractors, movers, utilities, inspectors, insurance agents, lawyers, and sundry government agencies, you realize this is kind of how it is.

But let's deal with a different type of failure.  Powershell uses ErrorAction to define how a script responds to errors.  This can be defined globally by assigning a value to the $ErrorActionPreference variable.  You can override default behavior for a specific cmdlet by using the -ErrorAction common parameter.  Possible values are Stop, Inquire, Continue, and SilentlyContinue.  These are explained in the snippet from help about_preference_variables.

$ErrorActionPreference ErrorAction Stop Inquire Continue SilentlyContinue about_preference_variables -ErrorAction

Note that the default ErrorAction is actually Continue, not SilentlyContinue as stated in the help.  You can see examples of these settings by issuing the help about_preference_variables and help about_commonparameters commands.  As I debug scripts I set the $ErrorActionPreference to Inquire or Continue.  But once I put error handling in place I set it to SilentlyContinue.

What can I do to evaluate errors?  One way is to check the value of the variable $?.  This is set to $True if the previous command completed successfully and $False if it failed.  The variable $LastExitCode has the value of the exit code for the most recently executed command.  These variables give me all the power I need to simulate a DOS batch file, if that's what you need to do.

But wait, there's more!

If an error is raised the information about it gets added to the $Error variable.  $Error can be referenced like an array but it is actually a circular buffer with a default length of 256.  Once your script generates the 257th error the first error gets deleted to make room for the new error.  If you really want to keep more more than 256 errors you can set the $MaximumErrorCount variable.  The most recent error is referenced as $Error[0].  The $Error buffer can be cleared by using the $Error.Clear() method.  So now I have all the power I need to simulate a vbScript, not that there's anything wrong with that.

But wait, there's more!

PowerShell lets us create a trap.  This is a block of code that gets executed whenever an error is raised so you don't have to check for errors at each critical step.  If you need to raise an error use the Throw command.  Use the Continue command in the trap block to keep processing the rest of the script or use the Break command to exit the current block of code.

trap throw continue echo $Error Exception.Message
 
Traps only work inside scripts so don't use them in an interactive session.  If you don't include the Continue command at the end of the trap block then PowerShell will still display the default error message in red text in addition to the tasks in the trap.  Traps are scope aware so you can use different traps inside user defined functions.  In the following example the trap inside the function does not trigger the global trap that is outside the function.

function newtrap trap throw continue $Error Exception.Message

You can specify different traps for different types of exceptions.  For example you might have one trap that deals with file system errors and another that deals with network errors.  The powershell.com guys do a good job of explaining this and other intricacies.  Joel Bennet explores other anomalies.

But wait, there's more!

With PowerShell 2.0 and beyond we have the try-catch-finally construct used in modern object oriented languages.  This not only gives you a sweet way to methodically handle errors but also lets you break the script into logical chunks and use the Write-Progress cmdlet to show users how close we are to completion.

try catch finally write-progress break

And like the Trap, you can have different Catch blocks for different types of errors.  In the first section of the previous example where I read the data, I could have one catch block if the file is not found, another catch block if I can't read the file, and another as a catch all catch to catch whatever else I didn't catch:

Try {
    # Read the data
}
Catch [System.IO.FileNotFoundException] {
    echo "The file wasn't found"
    break
}
Catch [System.IO.IOException] {
    echo "The file could not be opened"
    break
}
Catch {
    echo "An unexpected error happened.  Check the Mayan calendar."
    break
}

As usual, most of these examples are stupid.  If all you do is tell the user that an error happened you don't need any of these facilities.  Just let PowerShell show the default error message and take the appropriate ErrorAction.  The real power in error handling is to take corrective action: prompt the user for a file that exists, fix the input so it has the correct format, reset a failed network connection, cast the ring of power into the fires of Mount Doom, etc.

Remember, failure is a natural and happens all the time.  Recovering by turning failure into success is what error handling is all about.  PowerShell has abundant tools to help you achieve that goal.


Thursday, September 13, 2012

Did I do that?

In one of my first college computer science classes the professor asked the question, "Half of your code should be what?"  To which I replied, "functioning".  The professor wasn't amused but I wasn't far off.  The answer he was looking for was error handling.  Anybody can program a tic-tac-toe game but a well written game will give the user useful information when they try to input something other than an X or O.
http://www.kellie.de/jw1/steve4.jpg
If I am writing a script that only I will use then I won't bother with adding error handling.  In those cases I usually leave all output turned on so if an error arises I can see and troubleshoot it.  But if a script will be used by others I try to make it as friendly as possible.

When I first started writing DOS batch files the only error handling was through the IF ERRORLEVEL command.  ERRORLEVEL is populated with the return code from the previous command.  The return code is zero if the command completed successfully and something else if it failed.  IF ERRORLEVEL evaluates to TRUE if the ERRORLEVEL is greater than or equal to the value supplied.  So error handling in batch files consisted of a bunch of IF statements with the known ERRORLEVELs and associated GOTO statements.

IF ERRORLEVEL 10 GOTO Error10
IF ERRORLEVEL 5  GOTO Error5
IF ERRORLEVEL 1  GOTO Error1
GOTO Success

:Error10
ECHO You got your peanut butter in my chocolate
GOTO Success

:Error5
ECHO You got your chocolate in my peanut butter
GOTO Success

:Error1
ECHO I don't have chocolate or peanut butter

:Success
ECHO And now I'm hungry

Batch file processing has improved over the years.  You can still use the IF ERRORLEVEL statement but if you have command extensions enabled then ERRORLEVEL is also an environment variable.  The first three lines in the previous script could be reduced to the single line:

IF ERRORLEVEL 1 GOTO Error%ERRORLEVEL%

Also the IF statement is now more robust and allows for standard numerical comparisons as well grouping multiple commands in parentheses.

IF %ERRORLEVEL% EQU 10 (
    ECHO You got your chocolate in my peanut butter
) ELSE (
IF %ERRORLEVEL% EQU 5 (
    ECHO You got your peanut butter in my chocolate
) ELSE (
IF %ERRORLEVEL% GEQ 1 (
    ECHO I don't have chocolate or peanut butter
)))
ECHO And now I'm hungry

Those are stupid examples.  You have capabilities to not only provide user feedback, but to retry failed operations, solicit input from users, or enable other resolutions.  Still, the facilities are rudimentary.

In vbScript the facilities improve.  vbScript error handling starts with the On Error statement which defines whether error handling is on or off.  On Error Goto 0 turns off internal error handling and lets your script fail on error.  On Error Resume Next turns on error handling and enables the internal Err object.  This object contains the error number as well as descriptive information.

On Error Resume Next

' Do something useful here
If Err.Number <> 0 Then
    WScript.Echo "Error: " & Err.Number
    WScript.Echo "Source: " &  Err.Source
    WScript.Echo "Description: " &  Err.Description
    Err.Clear
End If

Note that we clear the error after reporting it.  If the Err object doesn't get cleared then our next test of Err.Number might report the previous error.

This generic error handling can be enclosed in a user defined function and called for each error detected.

On Error Resume Next

' Do something useful
If Err > 0 Then
        DisplayErrorInfo
End If

' Do something else useful
If Err > 0 Then
        DisplayErrorInfo
End If

Sub DisplayErrorInfo
    WScript.Echo "Error:      : " & Err
    WScript.Echo "Source      : " & Err.Source
    WScript.Echo "Description : " & Err.Description
    Err.Clear
End Sub

If you know which error codes are returned by the application being called then you can do something more elegant than just return generic error information.  Here is some code pinched from The Scripting Guys.

On Error Resume Next

strComputer = "."
arrTargetProcs = Array("calc.exe","freecell.exe")

Set objWMIService = GetObject("winmgmts:" _
 & "{impersonationLevel=impersonate}!\\" & strComputer & "\root\cimv2")

For Each strTargetProc In arrTargetProcs
    Set colProcesses = objWMIService.ExecQuery _
      ("SELECT * FROM Win32_Process WHERE Name='" & strTargetProc & "'")

    If colProcesses.Count = 0 Then
        WScript.Echo VbCrLf & "No processes named " & strTargetProc & " found."
    Else
        For Each objProcess in colProcesses
            WScript.Echo VbCrLf & "Process Name: " & objProcess.Name
            Wscript.Echo "Process ID: " & objProcess.Handle
            Wscript.Echo "Attempting to terminate process ..."
            intTermProc = TerminateProcess(objProcess)
        Next
    End If
Next

'***********************************************************************
Function TerminateProcess(objProcess)

    On Error Resume Next
    intReturn = objProcess.Terminate
    Select Case intReturn
        Case 0 Wscript.Echo "Return code " & intReturn & _
                " - Terminated"
        Case 2 Wscript.Echo "Return code " & intReturn & _
                " - Access denied"
        Case 3 Wscript.Echo "Return code " & intReturn & _
                " - Insufficient privilege"
        Case 8 Wscript.Echo "Return code " & intReturn & _
                " - Unknown failure"
        Case 9 Wscript.Echo "Return code " & intReturn & _
                " - Path not found"
        Case 21 Wscript.Echo "Return code " & intReturn & _
                " - Invalid parameter"
        Case Else Wscript.Echo "Return code " & intReturn & _
                " - Unable to terminate for undetermined reason"
    End Select
    TerminateProcess = intReturn

End Function

Something else to note is that the Err object has the method Raise which allows you to generate an error on demand.  This is useful for debugging error handling code or if you just want to punk your users.  It is also useful if you need to pass errors to other modules.  Note that you have to add the constant vbObjectError to the error number you want to raise to prevent collision with existing errors.

In the next post I will discuss error handling in PowerShell.  In case you couldn't guess, it is far superior to DOS and vbScript.

Sunday, August 19, 2012

Splat in the Hat

In PowerShell the @ character is called the splat operator.  I'm still trying to figure out why it is called splat.
I'm pretty sure that's not why.  Nevertheless the splat operator has many uses in PowerShell.

In a previous post I demonstrated using the splat operator to create a custom object.

$X = New-Object PSObject -Properties @{
     Name="ObjectName";
     SomeValue=1;
     AnotherValue=10
}

The splat operator is also used to define an array.

$Array = @("one","two","three","four")

PowerShell is forgiving and will let you define an array without the splat operator.

$Array = "one","two","three","four"

But if you need to force the results to be an array you can use the splat operator.  I frequently do this if I'm creating an array of custom objects.  I first define an empty array, then fill it with the objects.

$Procs = @()
foreach ($P in (get-process | get-unique)) {
   $New = New-Object PSObject -Property @{
      Name=$P.ProcessName;
      Company=$P.Company;
      Product=$P.Product;
      Version=$P.ProductVersion
   }
   $Procs += $New
}
$Procs


The splat operator can also be used to force the results of a command into an array.  Enclose the command or cmdlet in parentheses and precede the opening parenthesis with the splat operator.
In the above example the variable $X has a length of 843 because it measures the length of the string returned by the Dir command.  $Y and $Z have a length of 1 because it is the length of the array.  The length of the first and only element of those single element arrays matches the length of the string $X.  I included the variable $Z to show another way of forcing a variable to be an array.

The splat operator is also used to create hash tables.  Hash tables are similar to dictionary objects in VBScript but are much more versatile.  A basic hash table lets you add and remove members in addition to doing searches.  To create the hash table start with the splat, enclose the table in curly braces, and separate items with semi-colons.

$Meals = @{"Breakfast"="Eggs";"Lunch"="Sandwich";"Supper"="Chicken"}


Another use for hash tables (and by association our friend the splat operator) is to define a group of parameters for cmdlets.  In this use the keys are the named parameters and the values are the input for the parameters.

Notice that when the hash table is used to provide parameters to the cmdlet the variable name is preceded with the splat operator instead of the dollar sign.  This tells PowerShell to process the variable as a hash table and use the keys and values as parameters to the cmdlet.

This technique is really useful for making code more readable.  The cmdlet Write-EventLog lets you add records to the Windows event logs.  In the example below I use the source WSH because its events have free form messages which allows me to use Get-WinEvent to confirm the results.

Write-EventLog -LogName Application -Source WSH -EventID 0 -EntryType Information -Message "I added this to the event log from PowerShell"


That works but the Write-EventLog cmdlet gets cumbersome with all of the parameters on a single line.  If I splat the parameters in a hash table the code becomes much easier to read and costs very little extra typing.

$ELParams = @{
    'LogName' = 'Application';
    'Source'  = 'WSH';
    'EventId' = 0;
    'EntryType'= 'Information';
    'Message' = 'I splatted this to the Application log using PowerShell'
}
Write-EventLog @ELParams


Note that while I hard coded all of the parameter names and values in the hash table I could just as easily use variables for any of them.  This allows for some sophisticated processing inside loops and user defined functions.

One final use for the splat operator is the Here-String.  A Here-String is PowerShell's facility for specifying a large block of text that spans multiple lines.  Start the bock of text with the splat and quote @" and end the block with a quote and splat "@.  (On a personal note "Quote and Splat" is the law firm who handled my divorce settlement.)  Inside the Here-String you can specify line breaks and include quotes and other special characters.  The Here-String will display just as you specified.


The splat operator gives us a variety of shortcuts to keep our code efficient and tidy.  But remember that with great power comes great responsibility.  So remember to splat wisely, unlike this juvenile.

Commentors:  Seriously, does anybody know why they call it splat?

Monday, July 16, 2012

A good time

Time is what keeps everything from happening all at once.  I think Confucius said that.  Or maybe it was one of those stoner guys I met at college.  Either way most humans agree that time is frequently useful.


Sometimes you need to know how long it takes a script to run.  This comes in handy if you are comparing various techniques to accomplish a task and want to find the most efficient approach.  Or if you need to benchmark a script with a small data set to estimate how long it will take with the full data set.  Or maybe you are just curious like a cat.

vbScript has the function Time that returns the (you guessed it) current system time.  It is returned as a datetime value so use the DateDiff function to compare the difference between two values.  My sample script is:

StartTime = Time
wscript.echo StartTime


for i = 1 to 100000000
next


EndTime = Time
wscript.echo EndTime


TotTime = DateDiff("s",StartTime,EndTime)wscript.echo TotTime

wscript.echo "The operation took " + cStr(TotTime) + " seconds."


The Time and DateDiff functions only offer time accurate to the second.  Instead we should use the Timer function.  This not only offers greater accuracy but it also lets us do simple math to see the results.

StartTime = Timer
wscript.echo StartTime


for i = 1 to 50000000
next


EndTime = Timer
wscript.echo EndTime


TotTime = cStr(EndTime-StartTime)
wscript.echo "The operation took " + TotTime + " seconds."


The DOS environment variable %TIME% is accurate to the hundredth of a second.  You can use this if you want to time the processing of a batch file, but you have to do some serious parsing of the variable by using the FOR command.  In this example I use FOR /F to break the %TIME% string into 4 pieces (hours, minutes, seconds, hundredths) and do a bunch of math to turn the whole thing into the number of hundredths of seconds since midnight.  (The two FOR /F commands are wrapped in the example below.)

echo OFF
echo %TIME%
for /F "tokens=1-4 delims=:." %%A in ('echo %TIME%') do set /A Start=(%%A*60*60*100)+(%%B*60*100)+(%%C*100)+%%D


for /L %%X in (0,1,10000) do rem

for /F "tokens=1-4 delims=:." %%A in ('echo %TIME%') do set /A Stop=(%%A*60*60*100)+(%%B*60*100)+(%%C*100)+%%D
ECHO ON


set /A TotTime=%Stop%-%Start%
set /A Secs=%TotTime%/100
set /A Hund=%TotTime% %% 100
echo "The operation took %Secs%.%Hund% seconds"


set Hund=0%Hund%
set Hund=%Hund:~-2%

echo "The operation took %Secs%.%Hund% seconds"

The math is pretty straightforward and I can calculate the elapsed time with simple subtraction.  I use the modulo operator (%) to separate hundredths from seconds.  But note that the environment variables are strings, so I still need to add a leading zero then take the last 2 characters of the string to make sure I have a 2 digit integer after the decimal point.


But PowerShell is the undisputed champ of scripting and and timing script execution is no exception.  Sure, there are cmdlets for finding the current time and methods for doing datetime math.  But why go to all that trouble when you have the Measure-Command cmdlet?  Enclose the code you need to benchmark in brackets and PowerShell gives you detailed timing information.


As always, the cmdlet returns an object that you can process through the pipeline.  Here I use the shortcut of finding just the number of seconds it took to run the code.


If you have plenty of time then you have time to kill. But if you are out of time you are out of luck. So don't take your time for granted unless you are granted more time, in which case you can take all the time you need.  So until next time, take your time and take care.


Monday, July 2, 2012

The shortest distance

Everybody likes shortcuts.  If you can save yourself some time and effort, why not take the opportunity?

Powershell offers several ways to save yourself some typing and shorten your command lines and scripts.  Plus you almost never blow yourself up.

One way is to string together all of the slicing and dicing you might need to do.  If a method for an object returns an array and I know I need a specific element in that array I can specify that element  right after the method invocation.  And I can call a method right from that array element.  Allow me to demonstrate.

In a previous example I had to parse the DistinguishedName for a user.  I model my test domain based on a former employer who managed users and computers by location.  Delegations were done so support staff at each site could manage their objects.  My OU structure looks like this:

In order to find the site name for an arbitrary user account I can assign a variable at each step to parse the DistinguishedName.  In this example I also show the value of the variables to confirm each step:

But I don't need to use all those variables.  This can be processed in a single line.  Below I build up each step.  The last line shows how I combine all of these steps into a single command:

Another handy shortcut is to enclose a command in parentheses and do the same slicing and dicing.  In the above example I don't even need to assign the Get-ADUser output to a variable.  I can use the command
 (Get-ADUser AlAlpha).DistinguishedName.split(',')[2].substring(3)

Letting PowerShell process things in parentheses has many uses and works for all cmdlets.  You can nest some really crazy crap and it will still work.  In the following example I know I have a user in Atlanta with the last name Alpha and I'm not sure what the account name is but I have to change his first name to Allen.  The first command get-aduser -searchbase "OU=Atlanta,OU=Locations,DC=toddp,DC=local" -filter * | where {$_.surname -eq 'Alpha'} shows how I can do this search.  In the second command I enclose that first command in parentheses and use that as the identity for my Set-ADUser command.  I call Get-ADUser one last time to show the change was made in the GivenName attribute.

Another PowerShell shortcut is to use aliases for the cmdlets. 
Here we see all of the aliases that start with the letter "g".  Two aliases I use frequently are gm for Get-Member and gwmi for Get-WmiObject.


In this example the Get-ADUser output is piped through the Get-Member cmdlet using the alias GM.

You can create your own aliases using the Set-Alias cmdlet.
After using Import-Module (or its alias, ipmo) to import the ActiveDirectory cmdlets I use Set-Alias to create the alias gadu for the Get-ADUser command.  Note that an alias can only be for a cmdlet, not a cmdlet and its parameters.  You can work around this limitation by using a function as shown in the last example for Set-Alias.


There are two other aliases that you may encounter.

There is a default alias for ForEach-Object which is the percent sign (%) and an alias for Where-Object which is the question mark (?).  This will come in handy.

How cool is this?  I pipe Get-Process through the ForEach-Object shortcut to pull out the ProcessName and use the Where-Object shortcut to show just the processes starting with the letter "c".  That's good enough for me.

In Powershell 3 there is an implied ForEach-Object for arrays.  Instead of piping the array through ForEach-Object cmdlet or shortcut you just enclose the object in parentheses and process the properties you need.
These are the processes running on my Windows 8 demo VM.  But if I need to grab just the process name I can use the syntax (Get-Process).ProcessName
Pretty sweet.  There are some other handy shortcuts coming in PowerShell 3.

So we have all these nice shortcuts.  Shouldn't we use them all the time?  The rule of thumb from our friend Don Jones is that if you are writing a quick and dirty command for yourself, then the shortcuts can save you time and effort.  But scripts with shortcuts look more cryptic and are harder to read.  So if you are creating a more invovled script that will be used by someone else you should be considerate and make it more accessible by avoiding shortcuts. 

Knowing these shortcuts and aliases (or at least how to find what is being aliased) helps you be more efficient.  And if you come across a script written by someone else who used them you won't be caught off guard

Tuesday, May 29, 2012

I, Object

As discussed in the post on the pipeline, part of the power behind PowerShell is that the output from most cmdlets is an object or an array of objects.  And cmdlets are designed to process objects received from the pipeline.  Since PowerShell is built on the .Net framework everything is an object.

An object has properties that contain information about the object and is operated on using methods.  For example, I am an object and have properties such as my name and phone number.  To contact me you might use the method of calling my phone number and addressing me by name. 

You can see the properties and methods of an object by piping it through the Get-Member cmdlet.  Even a scalar such as a simple string is still an object.
My string variable has an attribute named length, the number of characters in the string, and a bunch of methods for slicing and dicing the string.

An array is an object that is a collection of objects.  If you pipe an array through Get-Member you get the properties and methods of the objects contained in the array, not the array itself.  Arrays are very accommodating that way since the attributes of the members are much more interesting.

Some objects have many of properties.  Usually you want to keep just the few of those properties so you will use the Select-Object cmdlet to create the subset.

But what if I need to go in the opposite direction?  What if I need to add some properties to an object?  The Add-Member cmdlet is the answer to your question.
This is my string from the previous example.  I use Add-Member to append a property to the string that contains the last character in the string. 

Sometimes it is handy to create an array of custom objects.  I use this technique when my goal is to use Export-CSV to create a spreadsheet of just the information requested by my PHB

$CSV = 'C:\Users\Administrator\Documents\DisabledUsers.csv'
$All = Get-QADUser -Disabled -SearchRoot 'OU=Locations,dc=toddp,dc=local' `
          -SearchScope Subtree


$Disabled = @()
foreach ($U in $All) {
    $U.Name
    $New = New-Object Object
    $New | Add-Member NoteProperty Name $U.name
    $New | Add-Member NoteProperty First $U.FirstName
    $New | Add-Member NoteProperty Last $U.LastName
    $New | Add-Member NoteProperty Full $U.DisplayName
    $DN = $U.DN.Split(',')
    $Site = $DN[$DN.Length-4].Substring(3)
    $New | Add-Member NoteProperty Site $Site
    $Disabled += $New
}
$Disabled | Export-Csv $CSV -NoTypeInformation -Encoding ASCII

In this example I'm using the Quest Active Directory cmdlet Get-QADUser to show some information on disabled user accounts.  First I create the empty array by assigning it the value @().  (In PowerShell the @ is called the splat operator.  Apparently the designers thought calling it "splunge" was a bit silly.)  I then use the New-PSObject cmdlet to create a custom object in my loop.  I use Add-Member to add properties for my report to the object, and then append the custom object to the array.  My test domain has an OU named Locations which contains several site OUs and within those site OUs there are OUs for users and computers in the site.  So I parse the DN (distinguished name) property of the user account to determine the site name.

That works but it looks kind of ugly and requires too much typing.  In PowerShell 2 the New-Object cmdlet has been revamped to allow a technique called "splatting".  So instead of a bunch of Add-Member statements you assign all of the properties in a script bock that is preceded by the splat operator.

$CSV = 'C:\Users\Administrator\Documents\DisabledUsers2.csv'
$All = Get-QADUser -Disabled -SearchRoot 'OU=Locations,dc=toddp,dc=local' `
         -SearchScope Subtree


$Disabled = @()
foreach ($U in $All) {
   $U.Name
   $DN = $U.DN.Split(',')
   $Site = $DN[$DN.Length-4].Substring(3)
   $New = New-Object PSObject -Property @{
       Name  = $U.name;
       First = $U.FirstName;
       Last  = $U.LastName;
       Full  = $U.DisplayName;
       Site  = $Site
   }
   $Disabled += $New
}

$Disabled | Export-Csv $CSV -NoTypeInformation -Encoding ASCII

That saves me some typing and it does improve legibility.  But splatting doesn't respect the order of my properties:

So if I need the properties in a specific order I use the Select-Object cmdlet:

$Enabled = $Enabled | Select-Object name,First,Last,Full,Site
$Enabled | Export-Csv $CSV -NoTypeInformation -Encoding ASCII

Which gives us the output like the first example:

This technique gets even easier in PowerShell 3 which includes the object type [PSCustomObject].  Shay Levy goes into detail on how this will work once PowerShell 3 is released.  For my example the script in PowerShell 3 would look like:

$CSV = 'C:\Users\Administrator\Documents\DisabledUsers2.csv'
$All = Get-QADUser -Disabled -SearchRoot 'OU=Locations,dc=toddp,dc=local' `
         -SearchScope Subtree


$Disabled = @()
foreach ($U in $All) {
   $U.Name
   $DN = $U.DN.Split(',')
   $Site = $DN[$DN.Length-4].Substring(3)
   $Disabled += [PSCustomObject]@{
       Name  = $U.name
       First = $U.FirstName
       Last  = $U.LastName
       Full  = $U.DisplayName
       Site  = $Site
   }
}

$Disabled | Export-Csv $CSV -NoTypeInformation -Encoding ASCII

Not only does this save me even more typing, but the [PSCustomObject] will preserve the order of the properties and perform more efficiently than the New-Object cmdlet.

There is no need to object to PowerShell objects.  You can augment and condense the objects you get from cmdlets and even create your own objects.  Just another example of the awesome power of PowerShell.

Commentors: How else do you use custom objects to improve your efficiency? 

--updated 26 Jun 2012 to correct formatting--

Sunday, May 13, 2012

Hip-hip, Array

PowerShell variables all start with a dollar sign ($) so they are easily identifiable and possibly to indicate they have value.  You can assign a static value:
Or you can assign the value from the pipeline:
 

Many times the results of a pipeline will be an array.  Array?
No, not a "Ray".

An array is a sequential collection of objects (sometimes referred to as elements).  Each object in the collection can be referenced by an index number of its place in the sequence.  Enclose the index number in square brackets ([]) to retrieve that particular element.
Note that counting elements starts at 0.  And you can use the Length attribute to determine how many elements are in the array.

You can assign static values by assigning a comma separated list after the equal sign.  You can also provide a range of numeric values surrounding an ellipsis (..):

You can add an element to the end of an array using the plus sign (+):
Combing the plus and equals sign implies that we are adding the value to the variable on the left of the equation:
Something useful to note is that in Powershell the array doesn't have to include elements of the same type:

Usually we will use an array that is returned from the pipeline:
Get-Process returns all of the running processes.  I assign that output to the array $Procs.  I'm showing just the first 6 to save screen real estate and showcase another use of the ellipsis.

What if I want to do something with each element of the array?  I could create a for loop using the c-styled structure.  for ($i=0;$i -lt $procs.length;$i++) {#commands}.  But that is an old-school way of looping through an array.

Instead use the ForEach-Object cmdlet which loops through the array retrieving one element at a time.  You can pipe the variable into the foreach and use the automatic variable $_ to process the array elements:

The automatic variable $_ is handy if you are processing something along the pipeline.  But if you need to run multiple commands against the elements or do more complex processing it is often easier to assign a variable to each element:
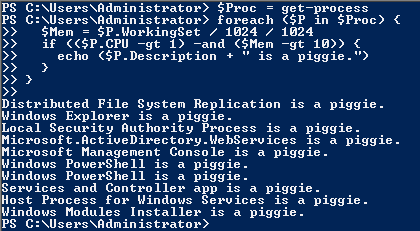
In this example I get the running processes.  I use the ForEach-Object cmdlet to loop through the array and find processes that consume a lot of memory and CPU.  I then exact my revenge on these processes through petty name calling.

If you will be working with PowerShell you need to get used to working with arrays.  Check out some of the resource links on the sidebar for more useful tips on working with them.

Commentors: Did I miss any good Ray's in the links?

Monday, April 30, 2012

Pipeline Conga Line

http://28.media.tumblr.com/tumblr_l2k058TExA1qzjpn4o1_500.jpg
Unix, DOS, and PowerShell all have the ability to combine commands so the output from one command becomes the input for the next command.  This is called a pipeline because the commands are connected like sections of a pipe.  All three platforms use the vertical bar as the connector which is why that character is sometimes referred to as the pipe.

Unix and DOS also use the less-than sign < to pipe input from a file to a command, the greater-than sign > to pipe output from a command to a text file, and two greater-than signs >> to append to a file.  All of these pipes are useful and you can sometimes do complex things, but because the Unix and DOS pipes are text based there are limitations on what can be accomplished.

PowerShell has powerful cmdlets for getting data to and from files so it only needs the vertical bar pipe.  Because PowerShell is object oriented and the cmdlets are designed to process objects passed from the pipeline some insanely powerful capabilities are available.  Often you can complete a task with a single command line.

So let's stop talking and start dancing.

Get-GPO -All | where {$_.displayname -match 'XenApp5'} | Set-GPPermissions -TargetName 'XAAdmins' -TargetType Group -PermissionLevel GpoEditDeleteModifySecurity

The administrators of our XenApp farm requested access to edit the group policies that manage the farm.  All of the GPOs include 'XenApp5' in the name.  The output from Get-GPO is piped into the Where-Object command to filter out any GPOs that don't have 'XenApp5' in the name.  The resulting objects are piped into the Set-GPPermissions cmdlet to assign the XAAdmins group the permission to edit the GPOs.  And I complete a complex task in a single line.

Most of your pipeline commands will follow this general pattern.  You will run a command or get some input, filter the pipeline to keep only the stuff you want to work on, then process those objects further.  The filters Where-Object and Select-Object are quite powerful but depending on your source you can speed up your scripts by filtering objects at the source.  Don Jones calls this Filter Left, Format Right.

That article also notes that the pipeline processor assumes that every pipeline ends with Out-Default to dump the results to the screen unless another Out-* command is at the end of the pipe.  PowerShell is using the Extended Type System to convert the objects to text and, unless directed otherwise, to make a best guess at how to format the results.  The Out-* commands produce no objects for any comdlets in the pipeline after them to process.  Therefore the Out-* command is always the last command, even if it is the implied Out-Default.

Where else can we send output?
If you are not using the implied Out-Default you will probably use Out-File, although Out-GridView has some handy capabilities.

What options do we have for formatting the data before we pipe it out somewhere?
Depending on the objects PowerShell will automatically Format-List or Format-Table before doing the implied Out-Default.  We have some handy ConvertTo cmdlets to format the data as HTML, CSV, or XML.  There are also the Export-CSV and Export-CliXML that combine the ConvertTo and Out-File operations into a single cmdlet.

So our pipeline conga line dance steps are:
  1. Get some data objects from a file or cmdlet
  2. Filter the data by limiting the number of objects and/or number of attributes
  3. Process the data by sorting or using the data in another cmdlet
  4. Repeat steps 2 and 3 as needed
  5. Format the data if needed
  6. Output the formatted processed data to the screen or file
Something like:

get-wmiobject win32_service | where {$_.StartMode -eq 'Auto'} | select-object name,displayName,PathName,StartName,Status,State | sort-object StartName,displayName

Use Get-WMIObject to find all of the services that are set to start automatically, select the properties of interest, and sort them so services running under the same account are grouped together.

Get-WMIObject does allow us to filter so we only get the WMI objects we want.  Doing so will make the command run faster because we return less data.  I can also format the output into a table so I get more information on the page.

get-wmiobject win32_service -filter "StartMode='Auto'" | select-object name,displayName,PathName,StartName,Status,State | sort-object StartName,displayName | format-table


If I replace Format-Table with Out-Gridview I get the output in an interactive window that lets me further sort and filter the data.


Or I can replace the Out-GridView with a Format-HTML | Out-File and create an .html web page that I can deliver to my PHB so he can open the report in his web browser.


So don't be a PowerShell wallflower.  Get out there and dance.


Commenters: Have you done any crazy cmdlet stacking on the pipeline?  How many cmdlets have you been able to use in a single pipeline?