Monday, April 30, 2012

Pipeline Conga Line

http://28.media.tumblr.com/tumblr_l2k058TExA1qzjpn4o1_500.jpg
Unix, DOS, and PowerShell all have the ability to combine commands so the output from one command becomes the input for the next command.  This is called a pipeline because the commands are connected like sections of a pipe.  All three platforms use the vertical bar as the connector which is why that character is sometimes referred to as the pipe.

Unix and DOS also use the less-than sign < to pipe input from a file to a command, the greater-than sign > to pipe output from a command to a text file, and two greater-than signs >> to append to a file.  All of these pipes are useful and you can sometimes do complex things, but because the Unix and DOS pipes are text based there are limitations on what can be accomplished.

PowerShell has powerful cmdlets for getting data to and from files so it only needs the vertical bar pipe.  Because PowerShell is object oriented and the cmdlets are designed to process objects passed from the pipeline some insanely powerful capabilities are available.  Often you can complete a task with a single command line.

So let's stop talking and start dancing.

Get-GPO -All | where {$_.displayname -match 'XenApp5'} | Set-GPPermissions -TargetName 'XAAdmins' -TargetType Group -PermissionLevel GpoEditDeleteModifySecurity

The administrators of our XenApp farm requested access to edit the group policies that manage the farm.  All of the GPOs include 'XenApp5' in the name.  The output from Get-GPO is piped into the Where-Object command to filter out any GPOs that don't have 'XenApp5' in the name.  The resulting objects are piped into the Set-GPPermissions cmdlet to assign the XAAdmins group the permission to edit the GPOs.  And I complete a complex task in a single line.

Most of your pipeline commands will follow this general pattern.  You will run a command or get some input, filter the pipeline to keep only the stuff you want to work on, then process those objects further.  The filters Where-Object and Select-Object are quite powerful but depending on your source you can speed up your scripts by filtering objects at the source.  Don Jones calls this Filter Left, Format Right.

That article also notes that the pipeline processor assumes that every pipeline ends with Out-Default to dump the results to the screen unless another Out-* command is at the end of the pipe.  PowerShell is using the Extended Type System to convert the objects to text and, unless directed otherwise, to make a best guess at how to format the results.  The Out-* commands produce no objects for any comdlets in the pipeline after them to process.  Therefore the Out-* command is always the last command, even if it is the implied Out-Default.

Where else can we send output?
If you are not using the implied Out-Default you will probably use Out-File, although Out-GridView has some handy capabilities.

What options do we have for formatting the data before we pipe it out somewhere?
Depending on the objects PowerShell will automatically Format-List or Format-Table before doing the implied Out-Default.  We have some handy ConvertTo cmdlets to format the data as HTML, CSV, or XML.  There are also the Export-CSV and Export-CliXML that combine the ConvertTo and Out-File operations into a single cmdlet.

So our pipeline conga line dance steps are:
  1. Get some data objects from a file or cmdlet
  2. Filter the data by limiting the number of objects and/or number of attributes
  3. Process the data by sorting or using the data in another cmdlet
  4. Repeat steps 2 and 3 as needed
  5. Format the data if needed
  6. Output the formatted processed data to the screen or file
Something like:

get-wmiobject win32_service | where {$_.StartMode -eq 'Auto'} | select-object name,displayName,PathName,StartName,Status,State | sort-object StartName,displayName

Use Get-WMIObject to find all of the services that are set to start automatically, select the properties of interest, and sort them so services running under the same account are grouped together.

Get-WMIObject does allow us to filter so we only get the WMI objects we want.  Doing so will make the command run faster because we return less data.  I can also format the output into a table so I get more information on the page.

get-wmiobject win32_service -filter "StartMode='Auto'" | select-object name,displayName,PathName,StartName,Status,State | sort-object StartName,displayName | format-table


If I replace Format-Table with Out-Gridview I get the output in an interactive window that lets me further sort and filter the data.


Or I can replace the Out-GridView with a Format-HTML | Out-File and create an .html web page that I can deliver to my PHB so he can open the report in his web browser.


So don't be a PowerShell wallflower.  Get out there and dance.


Commenters: Have you done any crazy cmdlet stacking on the pipeline?  How many cmdlets have you been able to use in a single pipeline?

Friday, April 6, 2012

PowerShell Prep

I like watching cooking shows because eating is my hobby.  I used to wonder how the host could complete a three course meal in 22 minutes when it takes me 30 minutes just to get started because I had to go back to the store to get that one ingredient I forgot to put on my shopping list.

http://www.glovegame.com/nutrition.html
The secret of the cooking shows is that the ingredients are prepped -- all of the vegies are chopped up and all of the spices are pre-measured.  The host tosses them in a pot, stirs them together, then pulls the pre-made masterpiece out of the second oven.  (I guess the real secret is that the cooking show hosts cheat.)

Let's get prepped and ready so we can do some cooking with PowerShell.

Ingredients

  1. Download the latest version of PowerShell.  PowerShell 2.0 is built into Windows 7 and Server 2008.  But there will be cool enhancements in PowerShell 3.0 so be sure to check Technet or Download Center before continuing. 
  2. Get any other modules or add-ins you might use.  This can include:
    1. The Remote Server Administration Tools (RSAT) which include modules for Active Directory and Group Policy management
    2. The PowerShellPack that has some extra modules for OS management
    3. The PowerShell Community Extensions which has some useful extras
    4. If you are working on a specific server application such as Exchange or SQL or SharePoint there are add-ins available from the install media
    5. VMWare's PowerCli if you will be managing VMWare vSphere environments
  3. Download the PowerGui which includes the best free IDE for PowerShell. Windows 7 and Server 2008 come with an IDE but it lacks many of the features of the PowerGui Script Editor.
  4. Download PowerGui PowerPacks for any applications you have to support. In particular the Active Directory PowerPack has many AD cmdlets that are often more powerful than those available in the Microsoft modules.


Recipe


Installing all this stuff is easy.  The downloads are all .exes or .msis.  A bunch of next-next-next and the installs are done.  One thing to note is that the RSAT modules are Windows features which are not available until you enable them. 

Control Panel > Programs > Turn Windows features on or off.

Expand Remote Server Administration Tools.  In the following examples I will use the Active Directory module so expand Role Administration Tools > AD DS and AD LDS Tools and select Active Directory Module for Windows PowerShell.  Select any other tools you will need.

While there are many useful extensions and add-ons for PowerShell, you probably don't want to install all of them, unless you plan to use them.  While it might be kind of handy to have everything available, at some point things get unwieldy.
http://www.wengerna.com/giant-knife-16999
There are two types of add-ons, modules and snap-ins.  Snap-ins are add-ons from version 1 of PowerShell while modules are add-ons available in version 2.  Because the Quest PowerGui ActiveDirectory PowerPack was available in version 1 it is still a snap-in.

How do you see what add-ons are available?

Get-Module -ListAvailable
Get-PSSnapin -Registered


Cmdlets in modules are not available until you import the module.  Cmdlets in snap-ins are not available until you add the snap in:

Import-Module <ModuleName>
Add-PSSnapin <SnapinName>


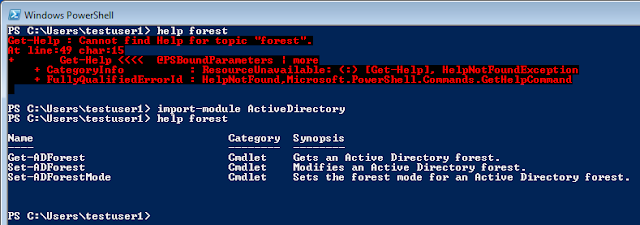
There are no cmdlets that contain the word "forest" until we import the ActiveDirectory Module


All PowerShell cmdlets have a verb-noun structure.  All of the Quest Active Directory cmdlets precede the noun with "QAD".  I don't have any QADComputer commands until I add the Quest.ActiveRoles.ADManagement snap-in.

But if I really want to save time in my PowerShell kitchen I should have the most common add-ons available every time I start PowerShell.  Frequently used modules or snap-ins can be included in my PowerShell profile.  There are four locations where you can store profiles, but the profile that is easiest to access is the one for the current user which is specified in the $profile variable.


Now when I launch PowerShell I have all of my Active Directory related cmdlets available.


Ummm.... OK.  Not quite.  When I install the Quest PowerPacks I get prompted to change the ExecutionPolicy to AllSigned.  The PowerPacks are signed so this setting is appropriate.  I will discuss signing in a future post.  But for now let's just bypass the execution policy for my test user.


Bypass is the least secure of the execution policies so I don't want to apply it everywhere.  Instead I apply it to just my test user by specifying -scope CurrentUser on the Set-ExecutionPolicy cmdlet.

Now when I launch PowerShell my add-ons are available


The default shell is good for running scripts behind the scenes such as logon scripts.  But for developing scripts the PowerGui Script Editor provides many advantages.  One of the advantages is that making add-ons available is a simple menu choice.

File > PowerShell Libraries...

ActiveDirectory and the Quest.ActiveRoles.ADManagement add-ons are already available because PowerGui still processes my profile script.  But cmdlets for other modules become available just by selecting them in this dialog and clicking OK.

Our PowerShell kitchen is prepped and ready.  Now we can start cooking so we can eat.

Commenters: What modules and snap-ins do you load in your profile?